Posts

Featured

Review of HiLetgo® ESP-WROOM-32 ESP32 ESP-32S Development Board

Image
Review of HiLetgo® ESP-WROOM-32 ESP32 ESP-32S Development Board 2.4GHz Dual-Mode WiFi + Bluetooth Dual Core Microcontroller Processor. Introduction After ordering my package from Amazon.com.au it arrived 3 business days later. It maybe different from where you purchase the item. I opened the package to reveal that the condition was excellent. Condition Well packed with foam padding to protect the pins. Inside of a sealed Anti-static bag. Listing The listing on Amazon.com.au indicated that it was a NodeMCU board one of the advantages of using this is that it is well supported. Lots of documentation, circuit diagrams, pinouts etc. It is mentioned in the listing Please Kindly Note: This board has no pin labeling on the top side. Inspection Breadboard friendly: Yes when placed on a prototype board it leaves one pin free on either side of the dev board, however, there is no pin labeling on the top of the board which is mentioned in the sellers description.

Review of MB102 Solderless Breadboard 830 Tie Points 2 buses, bread power supply and jumper cables.

Image
Review of MB102 Solderless Breadboard 830 Tie Points 2 buses, bread power supply and jumper cables. Introduction A solderless prototype breadboard allows the development of circuits for testing of designs as well as development of software for Arduino, ESP32, ESP8266 development boards and sensors. MB102 Power Supply This device can plug into the power rails of the breadboard and can supply 5Volts and 3V3 with an 2.1mm power jack with an  input voltage: 6.5-12 V (DC) or USB power supply at 700mA. MB102 Breadboard The breadboard has 830 tie points with two power supply rails.  Breadboard Jumper cables Consisting of 65PCS: 49 pcs 120mm length*2 8 pcs 150mm length*2 4 pcs 200mm length*2 4 pcs 240mm length*2 Where to buy ebay seller - alice1101983 Conclusion The quality of the breadboard is very good i recommend getting this set. Ideal for beginners and hobbyists.

Which driver to install for Arduino, ESP32 or ESP8266 Development boards

Image
Introduction When you first receive your development board you will want to plug it into your computer. What happens when your computer doesn't recognise it? You become annoyed, frustrated and confused. So what to do? It turns out that these boards have interface chips or Integrated Circuits (IC) that require drivers so that they can communicate to your computer. Chip Identification So how to identify the interface chip This is a CH340 IC that can be seen to have 16 pins and in a rectangular shape. Instructions for installing CH340/CH341 drivers. This is a CP2102 or CP2104 IC that is a square shape. Instructions for installing drivers for CP210x

Review of ESP8266 NodeMCU Development Board V3

Image
Review of  ESP8266 NodeMCU Development Board V3. Introduction After ordering my package from ebay it arrived 14 days later which is quite good from China. It maybe different from where you are located. I opened the package to reveal that the condition was excellent. Condition Well packed with foam padding to protect the pins. Inside of a sealed Anti-static bag. Listing The listing on ebay indicated that it was a NodeMCU board one of the advantages of using this is that it is well supported. Lots of documentation, circuit diagrams, pinouts etc. Inspection Breadboard friendly: Yes when placed on a prototype board it leaves one pin free on either side of the dev board, however, there is no pin labeling on the top of the board which is mentioned in the sellers description. Close examination of the board revealed no errors and is a clean board. USB to UART chip used: CH340 LiPo Battery support: no Setup Installing the ESP8266 core instruction

Review of HiLetgo® 120pcs/3*40pcs Breadboard Jumper Wires

Image
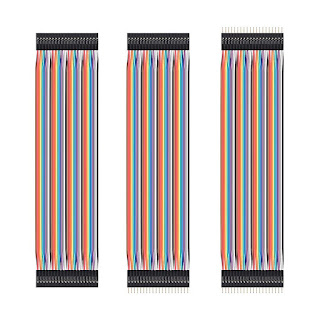
Review of HiLetgo® 120pcs/3*40pcs Breadboard Jumper Wires  Prototype Board Dupont Wire Male to Male, Male to Female, Female to Female, 2.54mm to 2.54mm 20CM Length THREE TYPE Jumper Wires Ribbon Cables Assortment Kit for Arduino Raspberry PI DIY Robot Building Introduction After ordering my package from Amazon.com.au it arrived 3 business days later. It maybe different from where you purchase the item. I opened the package to reveal that the condition was excellent. Condition Well packed in plastic bubble wrap with no bent pins. Listing The listing on Amazon.com.au indicated that there are three sets of cables, a male to male, a female to male and a female to female in groups of 40 cables with dimensions of 0.127mm, 36 AWG/ single wire, a length of 20cm(7.87inch)/ at 2.54mm spacing. Inspection Close inspection revealed no errors with good construction of parts. Good solid connections of pins and sockets when inserted into breadboard or pinout heade

Review of HiLetgo® UNO R3 ATmega328P CH340 Development Board

Image
Review of HiLetgo® UNO R3 ATmega328P CH340 Development Board Introduction After ordering my package from Amazon.com.au it arrived 3 business days later. It maybe different from where you purchase the item. I opened the package to reveal that the condition was excellent. Condition Inside of a sealed Anti-static bag. Comes with additional male header pins and a USB A to USB B cable. Listing The listing on Amazon.com.au indicated that it was a Arduino UNO clone board, Meaning it uses an ATmega328P microcontroller chip.  It also has a CH340G USB to serial interface chip. Inspection Examination of the board revealed no errors and of good construction. Soldering was clean of any residue. This board uses a Surface Mount ATMEGA328P chip with a ch340T USB to Serial interface chip. It has extra pins that can be soldered on the board allowing additional functionality. USB to UART chip used: ch340t chip Installing CH340/ CH341 driver Instructions for installing c

Review of HiLetgo® esp8266 NodeMCU CP2102 ESP-12E

Image
Review of HiLetgo® ESP8266 NodeMCU LUA CP2102 ESP-12E Internet WIFI Development Board. Introduction After ordering my package from Amazon.com.au it arrived 3 business days later. It maybe different from where you purchase the item. I opened the package to reveal that the condition was excellent. Condition Well packed with foam padding to protect the pins. Inside of a sealed Anti-static bag. Listing The listing on Amazon.com.au indicated that it was a NodeMCU board one of the advantages of using this is that it is well supported. Lots of documentation, circuit diagrams, pinouts etc. Inspection Breadboard friendly: Yes when placed on a prototype board it leaves one pin free on either side of the dev board, however, there is no pin labeling on the top of the board which is mentioned in the sellers description. Close examination of the board revealed no errors and is a clean board. USB to UART chip used: Silicon Labs CP2102 LiPo Battery sup

Setup for using ESP8266 development boards

Setup for using ESP32 development boards Installing the ESP8266 Core Installing with Boards Manager Starting with 1.6.4, Arduino allows installation of third-party platform packages using Boards Manager. We have packages available for Windows, Mac OS, and Linux (32 and 64 bit). Install the current upstream Arduino IDE at the 1.8 level or later. The current version is at the  Arduino website . Start Arduino and open Preferences window. Enter  http://arduino.esp8266.com/stable/package_esp8266com_index.json  into  Additional Board Manager URLs  field. You can add multiple URLs, separating them with commas. Open Boards Manager from Tools > Board menu and install  esp8266  platform (and don't forget to select your ESP8266 board from Tools > Board menu after installation). Boards manager link:  http://arduino.esp8266.com/stable/package_esp8266com_index.json Documentation:  https://arduino-esp8266.readthedocs.io/en/2.4.1/  For further information visit this site