Posts

Showing posts from May, 2018

Review of HiLetgo® 120pcs/3*40pcs Breadboard Jumper Wires

Image
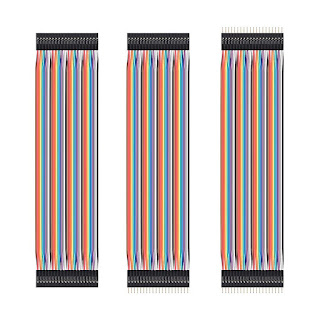
Review of HiLetgo® 120pcs/3*40pcs Breadboard Jumper Wires  Prototype Board Dupont Wire Male to Male, Male to Female, Female to Female, 2.54mm to 2.54mm 20CM Length THREE TYPE Jumper Wires Ribbon Cables Assortment Kit for Arduino Raspberry PI DIY Robot Building Introduction After ordering my package from Amazon.com.au it arrived 3 business days later. It maybe different from where you purchase the item. I opened the package to reveal that the condition was excellent. Condition Well packed in plastic bubble wrap with no bent pins. Listing The listing on Amazon.com.au indicated that there are three sets of cables, a male to male, a female to male and a female to female in groups of 40 cables with dimensions of 0.127mm, 36 AWG/ single wire, a length of 20cm(7.87inch)/ at 2.54mm spacing. Inspection Close inspection revealed no errors with good construction of parts. Good solid connections of pins and sockets when inserted into breadboard or pinout heade

Review of HiLetgo® UNO R3 ATmega328P CH340 Development Board

Image
Review of HiLetgo® UNO R3 ATmega328P CH340 Development Board Introduction After ordering my package from Amazon.com.au it arrived 3 business days later. It maybe different from where you purchase the item. I opened the package to reveal that the condition was excellent. Condition Inside of a sealed Anti-static bag. Comes with additional male header pins and a USB A to USB B cable. Listing The listing on Amazon.com.au indicated that it was a Arduino UNO clone board, Meaning it uses an ATmega328P microcontroller chip.  It also has a CH340G USB to serial interface chip. Inspection Examination of the board revealed no errors and of good construction. Soldering was clean of any residue. This board uses a Surface Mount ATMEGA328P chip with a ch340T USB to Serial interface chip. It has extra pins that can be soldered on the board allowing additional functionality. USB to UART chip used: ch340t chip Installing CH340/ CH341 driver Instructions for installing c

Review of HiLetgo® esp8266 NodeMCU CP2102 ESP-12E

Image
Review of HiLetgo® ESP8266 NodeMCU LUA CP2102 ESP-12E Internet WIFI Development Board. Introduction After ordering my package from Amazon.com.au it arrived 3 business days later. It maybe different from where you purchase the item. I opened the package to reveal that the condition was excellent. Condition Well packed with foam padding to protect the pins. Inside of a sealed Anti-static bag. Listing The listing on Amazon.com.au indicated that it was a NodeMCU board one of the advantages of using this is that it is well supported. Lots of documentation, circuit diagrams, pinouts etc. Inspection Breadboard friendly: Yes when placed on a prototype board it leaves one pin free on either side of the dev board, however, there is no pin labeling on the top of the board which is mentioned in the sellers description. Close examination of the board revealed no errors and is a clean board. USB to UART chip used: Silicon Labs CP2102 LiPo Battery sup

Setup for using ESP8266 development boards

Setup for using ESP32 development boards Installing the ESP8266 Core Installing with Boards Manager Starting with 1.6.4, Arduino allows installation of third-party platform packages using Boards Manager. We have packages available for Windows, Mac OS, and Linux (32 and 64 bit). Install the current upstream Arduino IDE at the 1.8 level or later. The current version is at the  Arduino website . Start Arduino and open Preferences window. Enter  http://arduino.esp8266.com/stable/package_esp8266com_index.json  into  Additional Board Manager URLs  field. You can add multiple URLs, separating them with commas. Open Boards Manager from Tools > Board menu and install  esp8266  platform (and don't forget to select your ESP8266 board from Tools > Board menu after installation). Boards manager link:  http://arduino.esp8266.com/stable/package_esp8266com_index.json Documentation:  https://arduino-esp8266.readthedocs.io/en/2.4.1/  For further information visit this site 

Installing Silicon Labs CP210x USB to UART Bridge VCP Drivers

Image
Installing Silicon Labs CP210x USB to UART Bridge VCP Drivers. MAC Download here Unzip file Open up SiLabsUSBDriverDisk.dmg file Follow the prompts restart the computer Windows  Download  here Linux Download  here

Setup for using ESP32 development boards

Image
Setup for using ESP32 development boards Installing the ESP32 Core Mac Open Terminal and execute the following command (copy->paste and hit enter): mkdir -p ~ /Documents/Arduino/hardware/espressif && \ cd ~ /Documents/Arduino/hardware/espressif && \ git clone https://github.com/espressif/arduino-esp32.git esp32 Once complete then with following copy->paste into terminal and hit enter cd esp32 && \ git submodule update --init --recursive && \ cd tools && \ python get.py If you get the error below. Install the command line dev tools with xcode-select --install and try the command above again: xcrun: error: invalid active developer path (/Library/Developer/CommandLineTools), missing xcrun at: /Library/Developer/CommandLineTools/usr/bin/xcrun xcode-select --install Restart Arduino IDE Windows Download and install the latest Arduino IDE  Windows Installer  from  arduino.cc Download and inst

Review of HiLetgo® ESP-WROOM-32 ESP32 ESP-32S Development Board

Image
Review of HiLetgo® ESP-WROOM-32 ESP32 ESP-32S Development Board 2.4GHz Dual-Mode WiFi + Bluetooth Dual Core Microcontroller Processor. Introduction After ordering my package from Amazon.com.au it arrived 3 business days later. It maybe different from where you purchase the item. I opened the package to reveal that the condition was excellent. Condition Well packed with foam padding to protect the pins. Inside of a sealed Anti-static bag. Listing The listing on Amazon.com.au indicated that it was a NodeMCU board one of the advantages of using this is that it is well supported. Lots of documentation, circuit diagrams, pinouts etc. It is mentioned in the listing Please Kindly Note: This board has no pin labeling on the top side. Inspection Breadboard friendly: Yes when placed on a prototype board it leaves one pin free on either side of the dev board, however, there is no pin labeling on the top of the board which is mentioned in the sellers description.

Installing CH340/ CH341 drivers for Arduino, ESP32 and ESP8266 boards

Image
Installing CH340 / CH341 drivers for Arduino, ESP32 and ESP8266 boards. Introduction With the development of Arduino, ESP32 and ESP8266 boards there has been a requirement to communicate to these devices via USB. There are several of these components or Integrated Circuits (IC) available that are installed on development boards. In order to communicate to these boards with Arduino IDE or other IDEs there is a requirement to install specific drivers. Procedures Close Arduino IDE Mac Download and install drivers from here After installing the drivers the computer is required to be restarted for the drivers to function. To confirm drivers are working correctly connect device goto terminal type ls -l /dev/tty.* the device will be displayed in the list as shown in the Figure 1 Figure 1 - list of devices Caution OSX Sierra (10.12) users It has been reported the driver WILL crash on OSX Sierra. Make sure to use this one instead: ch340 v1.3 driver For fur